Sunday, April 12, 2009
Wednesday, March 11, 2009
The Florida Room


This project started with an empty room after a son moved out and it was all based around an inspiration piece of a multicolored Floridian sleeper sofa that we inherited. This piece had never been used and even though the fabric was way to loud to use in a white room, it was still basically new and it was expensive and high quality. My mission in this room was to utilize the sofa and take the emphasis off of the bright colors and take your eye to the entire room and not to have your eye go directly to that sofa. I started with a basic bedroom with walls in "builder's white", and even though that room is nice size, empty, it was plain, white and without character.
I started out with a vision of what I wanted to accomplish and went to work. The first thing I did was to pick out coordinating fabrics that would blend with the sofa. It doesn't hurt having a very close friend as a talented upholsterer. I had a loveseat, small chair that I decided to recover and I had a daybed cover made to coordinate as well. Buying the fabric on sale is the key. With the colors I needed, that wasn't difficult. I chose fabric of lime green with small raised chenille squares for the loveseat and had a yellow and white small checked fabric chosen for the buttons, inside the skirt on the pleats and for the piping. There was enough of the lime green left over to be used for making the valances and my sister-in-law so graciously offered to tailor for the room. I then chose a small window-pane fabric in blue with pinstripes of green, royal blue and white for a small chair. That chair was given to me by my upholsterer friend and we argued over me paying him for it. The daybed was covered in a heavily textured solid white fabric and royal blue welting as trim with the horizontal surface being the solid royal blue.
The painting started with what I refer to as "clown yellow" for the walls, painting it up to a taped line 12" down from the ceiling. If you've ever tried to paint a wall yellow, you know that the paint rarely matches the swatch and it is difficult to get the shade you want. I just knew that I wanted to start out bright and then bring it back by covering it in a white glaze, which I did in 4 individual coats in a couple different techniques. I wanted the room to end up being a peaceful tone. I painted the ceiling a medium blue with the same 4 techniques in white over that, not in definite cloud formations, but to give the "allusion" of clouds, just not so defined. I brought that ceiling color down on the walls 6" so your eye would tend to notice the two different colors in an unexpected point. I joined the two colors by a 6" band painted in solid white, where I used a stencil of royal blue check. I got the look that I wanted, but will rethink a small stencil like that for an area as large as that on the next go around.
I used some scrap lumber to make shutters, then faux finished them in blue and white for a weathered look. I took a 4' x 8' section of picket fence, took it completely apart, and cut each picket to the heighth I wanted and changed the spacing to fit in a small corner area. The cellular window shades were used previously in this room in a royal blue and then I went antiquing and found the ugliest rattan tray tables for $40 a piece on sale for $8 for the two. White spray paint brought them around to "usable" status. Then there was the deal on the wicker vanity and stool for $30, wicker lamp shade for $3.50 and the large planter from a home improvement store that I bought on sale marked down from $49 to $7, spray painted it white, stuck a fern inside and placed a round glass top on it for a table. I had a wicker chest in the family that I painted white and then had my friend make a cushion for the top out of the yellow and white fabric. There are toss pillows in all fabrics everywhere. I used leftover fabric from the chair to upholster a box for the end table that actually housing a working phone inside. A friend makes rugs on a loom and he made one in solid royal blue and the secretary was used in another room and then I traded the basic ceiling fan from this room for the palm frond one from the master bedroom and placed a wicker serving basket under it against the ceiling as a medallion. Another friend raises peacocks and was looking to get rid of some feathers which look great in an urn in all the right colors that I found on EBay for next to nothing. I purchased pictures while in Florida at an outdoor art fair for a song and painted the frames white and the colors in the prints are a perfect match. All in all, I don't have $300 invested in this makeover. It was fun and a peaceful retreat to read a book in on a gloomy winter day. I have the "before" pictures included as well. Hope you enjoy the pictures!!
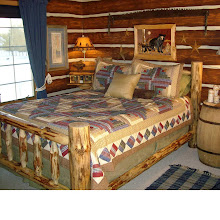
Monday, March 9, 2009
The Lodge


My first ever attempt at writing a blog..........
I had the idea that when my son moved out, that I would turn his empty room into a log cabin. I had nothing to go on but what I saw in my head. I have no formal training in design, but I know what works together and I am fortunate enough that I can visualize how a design plan can change the entire look of a room. With a new house, and four walls of builder's white, I had a long way to go.
Everything for this finished product was purchased on a shoe string and was on-hand before I struck the first brush of paint to the walls. With oak woodwork throughout the house, I started out painting the walls and ceiling pretty much a dark orange. When I had the two coats on all surfaces, you felt like you were on the inside of a basketball and it was beyond unattractive. My sanity would have been checked had it not been for the fact that the family knows that this was not first time I have gone off on an idea. Besides, it's paint!
Thirty eight rolls of tape to pull this idea off was not an option. I borrowed a laser level that throws a line 360 degrees. After the walls were measured so that the "logs" would come out even, I started with the laser on the floor raised up by a few magazines so that I could scribe my first line to be the top of the first mortar line over the baseboard, but also the bottom of the first log. Next came the top of that first log, then following suit until the entire wall was marked off evenly using reddish-brown deck stain full strength. That laser was hoisted on top of books, magazines, dvd cases, foot stools, step ladders, etc until I could come up with the measurements I wanted. Then, I came back within those lines and added more full strenghth stain for "shading" to try and give the "logs" a three dimensional look. Next, I had to try to tackle the ceiling and figure how I could do that in the look of planks. So, I turned the lazer on it's side, marked the ceiling at both ends and tried to connect the two lines with that laser line... you need patience for this one. I free-handed those lines.............it's a log cabin, not intended to look perfect. I figured that most planks are 8' in length, so the only place that I used tape other than to protect the baseboards, window openings and doors were to define the end of the "planks"
Once all of the shading was done on the walls only, none on the ceiling, I filled in the "mortar lines" with a color that I came up with by blending odds and ends of paints I had on hand and I ended up with a light putty color, which is what I had in mind. I bought an empty paint can and made my own glaze to thin the deck stain down for it to become translucent so I could still see the ugly orange through it. I can give you an way to save money and how to make your own glaze, regardless of deck stain, pink, or blue walls. It works great. I would place the glaze on the "log" area, then come on it with a wood graining tool. Nothing to it. This takes about 5 minutes or less to get your technique down. Actually, this goes tremendously fast. I did the same thing on the ceiling with no shading and the result was especially surprising.
Once this was done, the fun began in placing the furniture and accessories and DETAILS that I had gathered and saw in my head to get the finished product. I hope you enjoy it and please don't hesitate to contact me if you have questions about trying the same thing yourself. Remember, it's paint! The hardest thing about faux finishing is getting the nerve to try it. If you screw it up, so what, start over!
Drop me a line if I can encourage you to start something that you've always wanted to do, but never had the nerve. You'll never know if you don't try.................
Subscribe to:
Posts (Atom)
