


My first ever attempt at writing a blog..........
I had the idea that when my son moved out, that I would turn his empty room into a log cabin. I had nothing to go on but what I saw in my head. I have no formal training in design, but I know what works together and I am fortunate enough that I can visualize how a design plan can change the entire look of a room. With a new house, and four walls of builder's white, I had a long way to go.
Everything for this finished product was purchased on a shoe string and was on-hand before I struck the first brush of paint to the walls. With oak woodwork throughout the house, I started out painting the walls and ceiling pretty much a dark orange. When I had the two coats on all surfaces, you felt like you were on the inside of a basketball and it was beyond unattractive. My sanity would have been checked had it not been for the fact that the family knows that this was not first time I have gone off on an idea. Besides, it's paint!
Thirty eight rolls of tape to pull this idea off was not an option. I borrowed a laser level that throws a line 360 degrees. After the walls were measured so that the "logs" would come out even, I started with the laser on the floor raised up by a few magazines so that I could scribe my first line to be the top of the first mortar line over the baseboard, but also the bottom of the first log. Next came the top of that first log, then following suit until the entire wall was marked off evenly using reddish-brown deck stain full strength. That laser was hoisted on top of books, magazines, dvd cases, foot stools, step ladders, etc until I could come up with the measurements I wanted. Then, I came back within those lines and added more full strenghth stain for "shading" to try and give the "logs" a three dimensional look. Next, I had to try to tackle the ceiling and figure how I could do that in the look of planks. So, I turned the lazer on it's side, marked the ceiling at both ends and tried to connect the two lines with that laser line... you need patience for this one. I free-handed those lines.............it's a log cabin, not intended to look perfect. I figured that most planks are 8' in length, so the only place that I used tape other than to protect the baseboards, window openings and doors were to define the end of the "planks"
Once all of the shading was done on the walls only, none on the ceiling, I filled in the "mortar lines" with a color that I came up with by blending odds and ends of paints I had on hand and I ended up with a light putty color, which is what I had in mind. I bought an empty paint can and made my own glaze to thin the deck stain down for it to become translucent so I could still see the ugly orange through it. I can give you an way to save money and how to make your own glaze, regardless of deck stain, pink, or blue walls. It works great. I would place the glaze on the "log" area, then come on it with a wood graining tool. Nothing to it. This takes about 5 minutes or less to get your technique down. Actually, this goes tremendously fast. I did the same thing on the ceiling with no shading and the result was especially surprising.
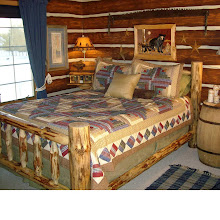
Once this was done, the fun began in placing the furniture and accessories and DETAILS that I had gathered and saw in my head to get the finished product. I hope you enjoy it and please don't hesitate to contact me if you have questions about trying the same thing yourself. Remember, it's paint! The hardest thing about faux finishing is getting the nerve to try it. If you screw it up, so what, start over!
Drop me a line if I can encourage you to start something that you've always wanted to do, but never had the nerve. You'll never know if you don't try.................

No comments:
Post a Comment